
Tired of the same old dyed eggs? This year, let’s make Easter egg decorating ideas more fun and unique! From gold-foil eggs that shimmer to silk-dyed eggs with intricate patterns, there are endless ways to get creative. Whether you love classic dyed eggs or modern painted designs, we’ve got ideas that will make your Easter egg decorating extra special. Ready to give your eggs a glow-up?
If you’re putting together a gorgeous Easter tablescape, crafting a DIY Easter wreath, or adding a festive Easter decoration display, decorated eggs bring the whole look together. Instead of reaching for store-bought kits, why not try fresh, creative techniques that are easy to do at home?
So grab your eggs, paints, and craft supplies, because we’ve got tons of fun, beautiful, and Instagram-worthy Easter egg decorating ideas!
Must-Have Supplies for Stunning Easter Egg Decorating Ideas
Before you dive into these Easter egg decorating ideas, make sure you have the right supplies to create stunning, one-of-a-kind designs!
Dyeing Supplies
- Vinegar – Helps the dye bond to the eggshell for more vibrant colors.
- Food Coloring – A simple, mess-free way to create pastel, bold, or ombré eggs.
- Natural Dyes – For an eco-friendly twist, use ingredients like red cabbage (blue/purple), turmeric (yellow), onion skins (orange), and beet juice (pink) to create beautiful earthy tones.
Painting Supplies
- Acrylic Paints – Great for bold, opaque colors that dry quickly.
- Watercolors – Perfect for soft, blended effects like floral Easter egg decorations.
- Paintbrushes & Sponges – Different brushes create unique textures, and sponges work well for marbled and galaxy egg designs.
Embellishments for Extra Flair
- Stickers & Washi Tape – Easy, mess-free ways to add patterns and shapes.
- Glitter & Sequins – For sparkly, glam Easter egg decorations.
- Ribbons & Lace – Wrap around eggs for a vintage farmhouse look.
- Temporary Tattoos – An effortless way to apply intricate designs with minimal effort.
Tools & Techniques
- Rubber Bands – Use for tie-dye or striped effects when dipping eggs in dye.
- Toothpicks & Skewers – Great for creating swirls, dots, or fine lines in painted or marbled eggs.
- Glue & Mod Podge – Essential for attaching sequins, dried flowers, or decorative paper.
- Fine-Tip Markers – Perfect for Sharpie silhouette eggs, doodle art, or lettering designs.
1. Stunning Dip-Dyed Easter Egg Decorating Ideas
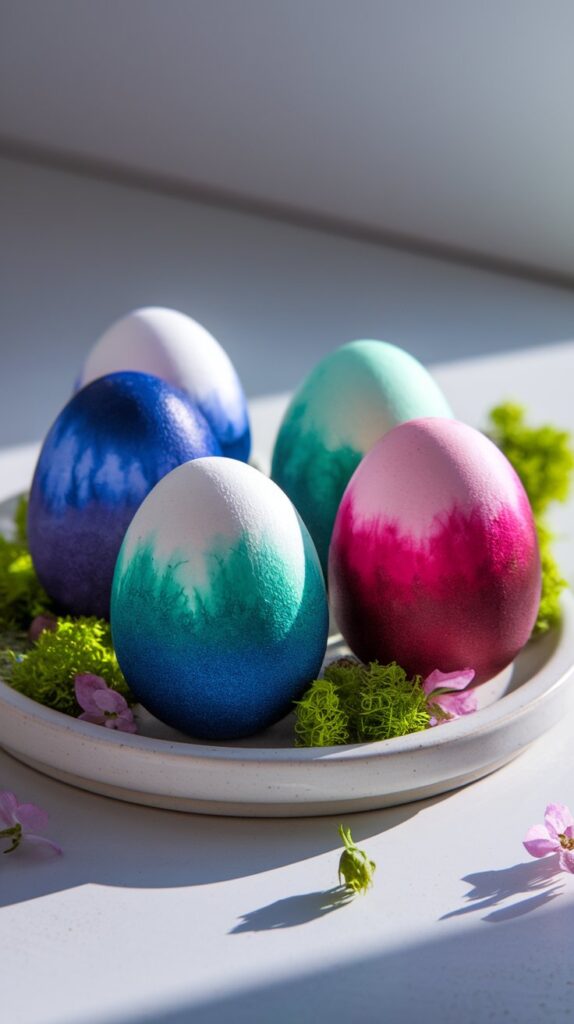
If you love simple yet stunning Easter egg decorating ideas, dip-dyeing is a must-try! With a few easy tweaks, you can create gradient ombré eggs or eye-catching two-tone designs that look effortlessly beautiful.
- Gradient Ombré Effect: To create a fading gradient effect, mix ½ cup boiling water, 1 teaspoon vinegar, and about 30 drops of food coloring in a bowl. Dip the egg into the dye, submerging it only halfway. After a few minutes, lift the egg slightly so that only part of it remains in the dye. Repeat this process in timed increments to create a smooth color transition from light to dark.
- Two-Tone Designs with Wax or Tape: To achieve clean, sharp color separation, use wax or painter’s tape to block off sections of the egg before dyeing. After the first dye bath, remove the tape and submerge the exposed area in a second color for a striking contrast.
2. Creative Marbled Easter Egg Creations for a Swirled Effect

Looking for Easter egg decorating ideas with a swirly, artistic touch? Try these two marbling techniques for a stunning effect!
- Shaving Cream or Whipped Topping Technique: Spread a layer of shaving cream or whipped topping onto a tray, then swirl in a few drops of food coloring using a toothpick or skewer. Roll the eggs through the mixture, ensuring they are evenly coated. Let them sit for about 30 minutes before wiping off the excess. The result? Gorgeous marbled Easter eggs with soft, fluid designs.
- Oil and Vinegar Method: This technique creates a more organic, watercolor-style swirl. Fill a bowl with water and add a splash of vinegar. Then, mix in a few drops of oil-based food coloring. Gently roll the eggs through the mixture, allowing the oil to create random marbled streaks. Let them dry, and you’ll have stunning DIY Easter egg designs with an elegant touch.
3. Dyed Easter Egg Decorating Ideas for a Natural Touch

If you prefer natural egg dyeing techniques, try using plant-based ingredients to create earthy, rich tones. Here are some excellent natural dyes:
- Beets (pink/red)
- Turmeric (yellow/gold)
- Red cabbage (blue/purple)
- Onion skins (orange/brown)
- Coffee or tea (warm brown tones)
To create these handmade Easter egg dyes, simmer the chosen ingredient in water with 1 tablespoon of vinegar per cup of liquid for about 30 minutes. Strain, let the dye cool, and soak your eggs for at least 2-4 hours (or overnight for richer colors).
For botanical prints, wrap small leaves or herbs around the eggs before dyeing using a nylon stocking or cheesecloth. The result? Gorgeous, nature-inspired Easter eggs with delicate floral impressions—a perfect farmhouse Easter decor idea!
4. Beautiful Hand-Painted Easter Egg Designs for a Unique Look

If you’re a fan of hand-painted Easter eggs, this technique is for you! Painterly eggs embrace an abstract, brushstroke-heavy style, perfect for achieving a whimsical, artistic look.
- Use acrylic paints and a soft-bristled brush to apply short, uneven strokes in varying colors.
- Allow each layer to dry before adding another color for depth and texture.
- Try a color-blocking effect by painting different sections of the egg in complementary hues.
The beauty of this method is that imperfection is perfection—embrace the brushstrokes and allow the colors to blend naturally for one-of-a-kind Easter egg designs!
5. Fun Crayon Resist Easter Egg Decorating Ideas with Hidden Patterns

This technique is a fun and easy way to create hidden patterns that only appear once the egg is dyed.
- Use a white crayon to draw floral patterns, polka dots, or geometric shapes on the egg.
- Dip the egg in dye, and watch as the wax resists the color, revealing intricate designs beneath the surface.
- You can also layer different colors—start with a light dye, then draw over it and re-dip into a darker shade for a multicolor effect.
6. Galaxy-Inspired Easter Egg Designs for a Starry Look

Galaxy-inspired painted Easter eggs are a trendy and visually striking alternative to traditional dyeing. To create cosmic-style eggs, you’ll need black, blue, purple, and gold paint:
- Base Layer: Paint the egg black and let it dry completely.
- Sponge Painting: Use a sponge or crumpled paper towel to dab on blue and purple paint in swirling motions.
- Starry Effect: Dip an old toothbrush in white or gold paint, then flick the bristles to create tiny speckles that resemble stars.
7. Easy Sharpie & Doodle Easter Egg Crafts

For a clean, artistic look, use Sharpie markers to create minimalist silhouette eggs or intricate doodles.
- Monochrome Doodles: Use a fine-tip black Sharpie to draw abstract patterns, floral designs, or even tiny Easter bunnies.
- Typography Eggs: Write inspirational quotes, names, or fun Easter-themed words for personalized Easter eggs.
- Silhouette Art: Use stencils or freehand designs to create shadow-like images of bunnies, flowers, or crosses.
This is a mess-free and easy Easter egg decorating technique, making it a great option for kids, beginners, and DIY home decorators!
8. Temporary Tattoo Easter Egg Decorating Designs for Stunning Results

One of the easiest ways to get intricate and professional-looking Easter egg designs is by using temporary tattoos. This method is mess-free and gives you stunning results in minutes!
How to Apply Temporary Tattoos to Easter Eggs
- Choose a temporary tattoo design—floral, geometric, metallic, or Easter-themed patterns work beautifully.
- Cut out the tattoo and peel off the plastic backing.
- Place the design face down on the egg and gently press a damp sponge or paper towel over it for about 30 seconds.
- Slowly peel off the paper backing, and let the design set!
You can use gold foil tattoos for a modern, elegant look, pastel florals for a soft spring vibe, or even quirky holiday-themed designs to match your Easter décor.
9. Glitter & Sequin Easter Egg Creations for a Glamorous Touch
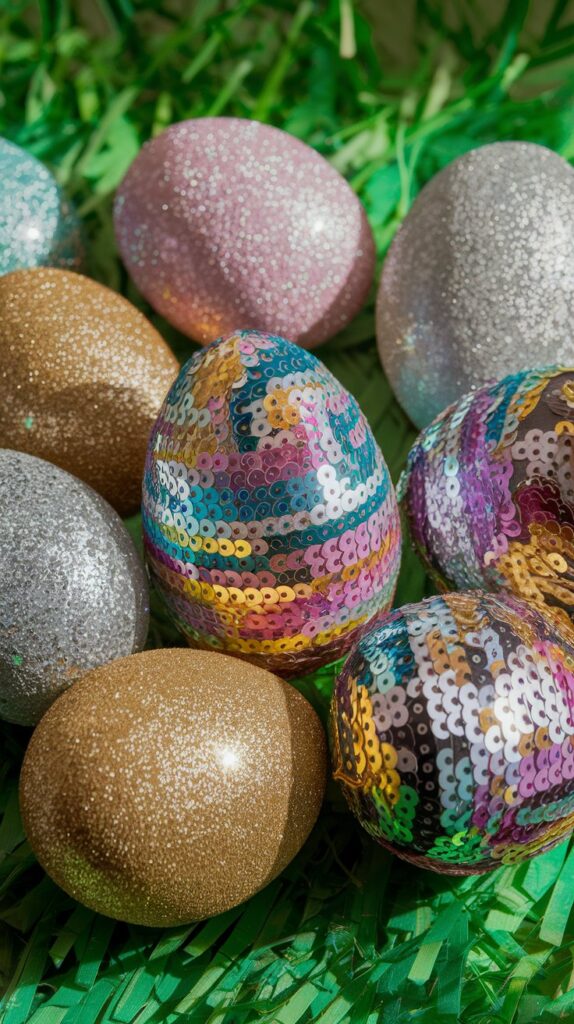
If you want sparkling, eye-catching Easter eggs, sequins and glitter are the way to go!
How to Decorate Easter Eggs with Sequins & Glitter
- Brush a thin layer of craft glue over the egg.
- Roll the egg in fine glitter or press individual sequins onto the surface.
- Let dry, then shake off any excess glitter to keep it mess-free.
- For patterned glitter eggs, use stencils or tape to create sections for glitter application.
These eggs look super fancy in Easter centerpieces and can even be used as chic home décor after the holiday!
10. Gold Leaf & Metallic Easter Egg Decorating Ideas for a Luxurious Finish

Gold leaf Easter eggs are a sophisticated and trendy way to decorate for Easter. The kintsugi-style technique, inspired by Japanese pottery, gives eggs an artistic cracked look with metallic details.
How to Make Gold Leaf Easter Eggs
- Brush small areas of the egg with gold leaf adhesive.
- Gently press gold, silver, or copper foil sheets onto the sticky surface.
- Use a soft brush to smooth out the foil and remove excess flakes.
For a kintsugi effect, crack an eggshell and carefully apply gold leaf along the cracks for a stunning broken-but-beautiful look.
11. Charming Mosaic & Découpage Easter Egg Designs for a Vintage Look

For a classic, handcrafted look, mosaic and découpage eggs are a must-try!
- Mosaic Eggs: Crush dyed eggshells and glue them onto a fresh egg to create colorful, stained-glass-like designs.
- Découpage Eggs: Cut floral napkins, tissue paper, or wrapping paper into small pieces, brush on Mod Podge, and carefully smooth the pieces onto the egg.
These farmhouse-style Easter eggs are perfect for vintage-themed décor and can even be preserved for future years!
12. Rustic Moss-Covered Easter Egg Decorating Ideas for a Natural Aesthetic
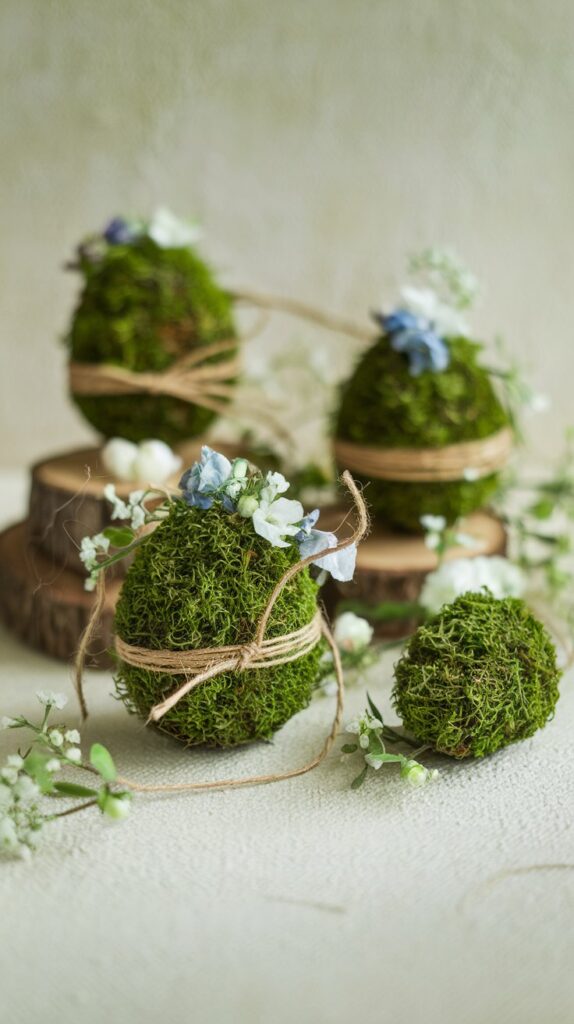
Moss-covered eggs are aesthetic and eco-friendly, making them great for decorative centerpieces rather than edible treats.
How to Make Moss Easter Eggs
- Brush the surface of a plastic or wooden egg with craft glue.
- Press dried or preserved moss onto the egg, covering it entirely.
- Let dry, then gently trim any overhanging moss for a polished, natural look.
These eggs make beautiful spring-inspired table décor and can be reused year after year!
13. Farmhouse-Inspired Speckled Easter Egg Painting Ideas

If you love the look of quail or robin eggs, this speckled egg technique is a simple but stunning way to decorate.
How to Make Speckled Easter Eggs
- Dye your eggs light blue, beige, or brown for a natural base.
- Mix a bit of brown or black paint with water and dip a toothbrush into it.
- Flick the bristles to spray tiny speckles over the eggs, creating a realistic speckled effect.
These minimalist and vintage-inspired Easter eggs are perfect for neutral and elegant holiday decorations!
14. Botanical Pressed Flower Easter Egg Ideas for a Cottagecore Feel

If you love the romantic, cottagecore aesthetic, pressed flower eggs are a breathtakingly delicate Easter egg decorating idea.
How to Attach Pressed Flowers to Easter Eggs
- Press real flowers by placing them between book pages for a few days.
- Apply a thin layer of Mod Podge to the egg and carefully place the flowers.
- Seal with another coat of clear varnish for long-lasting beauty.
These eggs are perfect for springtime weddings, nature-inspired Easter brunches, or DIY floral décor!
15. Sticker & Washi Tape Easter Egg Decorations

Stickers and washi tape are the easiest ways to decorate Easter eggs without dye, paint, or glue.
How to Decorate Easter Eggs with Stickers & Washi Tape
- Choose Easter-themed stickers like bunnies, chicks, flowers, or geometric shapes.
- Use washi tape to create striped, plaid, or patchwork patterns.
- Layer different designs for a colorful, playful look!
These simple Easter egg decorating ideas are great for toddlers and preschoolers who aren’t quite ready for painting or dyeing.
16. Elegant Silk-Dyed Easter Egg Creations

Silk-dyed Easter eggs create breathtaking patterned designs by transferring the dyes from printed silk fabric directly onto the egg. This method is an easy way to achieve detailed, professional-looking patterns without having to paint intricate designs by hand.
How to Make Silk-Dyed Easter Eggs
- Cut 100% silk fabric (like old ties or scarves) into squares large enough to wrap around an egg.
- Wrap the fabric tightly around the egg, making sure the printed side is touching the shell.
- Secure the fabric with twist ties or rubber bands to keep it snug.
- Wrap a second layer of plain white cotton fabric around the egg to hold the design in place.
- Place the eggs in a pot of water with ¼ cup of vinegar and bring to a gentle boil for 20-30 minutes.
- Remove the eggs, let them cool, and unwrap to reveal the stunning patterns!
This method works best with bold, intricate silk prints and produces elegant Easter egg designs perfect for holiday decor.
17. Cozy Crochet & Knitted Easter Egg Decorating Ideas

For a soft and eco-friendly Easter egg alternative, crochet and knitted eggs are a charming way to celebrate the season. These handmade Easter eggs are durable, reusable, and great for seasonal décor.
How to Make Crochet or Knitted Easter Eggs
- Use a small crochet hook and worsted-weight yarn to create a simple egg shape.
- Work in the round using single crochet stitches, gradually increasing and decreasing to shape the egg.
- Stuff the egg with polyfill or cotton stuffing before sealing it shut.
18. Felt & Fabric Easter Egg Designs for a Handmade Touch

If you love sewing, making felt or fabric eggs is a fun way to create soft, textured Easter decorations that can be used year after year.
How to Sew Felt Easter Eggs
- Cut out two identical egg-shaped fabric pieces from felt or cotton fabric.
- Use embroidery thread to stitch patterns, names, or floral details on one side.
- Sew the two pieces together, leaving a small opening to stuff with cotton or polyfill.
- Stitch it closed and add decorative details like ribbons, beads, or buttons.
19. Papier-Mâché & Wooden Easter Egg Decorating Ideas for Long-Lasting Decor

If you’re looking for long-lasting Easter decorations, papier-mâché and wooden eggs are the way to go. These sturdy alternatives to traditional dyed eggs can be painted, sealed, and displayed for years.
How to Make Papier-Mâché Easter Eggs
- Inflate small water balloons to egg size.
- Mix equal parts flour and water to create a papier-mâché paste.
- Dip small strips of newspaper or tissue paper into the paste and layer them over the balloon.
- Once dry, pop the balloon and paint the eggs with acrylic paints, metallic foils, or pastel colors.
For a polished, modern look, opt for wooden Easter eggs that can be painted, carved, or decoupaged. Seal with a clear matte or glossy finish for a professional touch. These eggs are perfect for Easter baskets, spring displays, or even gifts that last beyond the season.
Which of these Easter egg decorating ideas are you most excited to try? Will you go for silk-dyed eggs, create a galaxy-inspired masterpiece, or add a little gold leaf shimmer? Let us know in the comments—we’d love to hear what you’re making this Easter!
📌 Don’t forget to save this post on Pinterest for future Easter decorating inspiration. Happy Easter and happy decorating!